Mini Apple Crisps: The Ultimate Individual Dessert That Outshines Pie
Forget the fuss of slicing and serving a whole pie at your next gathering! While apple pie holds a nostalgic place in many hearts, we’re here to champion the superior party dessert: **mini apple crisps**. These delightful individual portions offer all the comforting flavors of a classic apple crisp—tender, spiced apples crowned with a sweet, buttery oat crumb—but in a perfectly sized package that’s tailor-made for celebrations, potlucks, and cozy fall evenings alike. They’re not just easier to serve; they’re often preferred for their satisfying balance of fruit and topping, a textural symphony that can genuinely be described as *better than pie* for an interactive dessert experience.
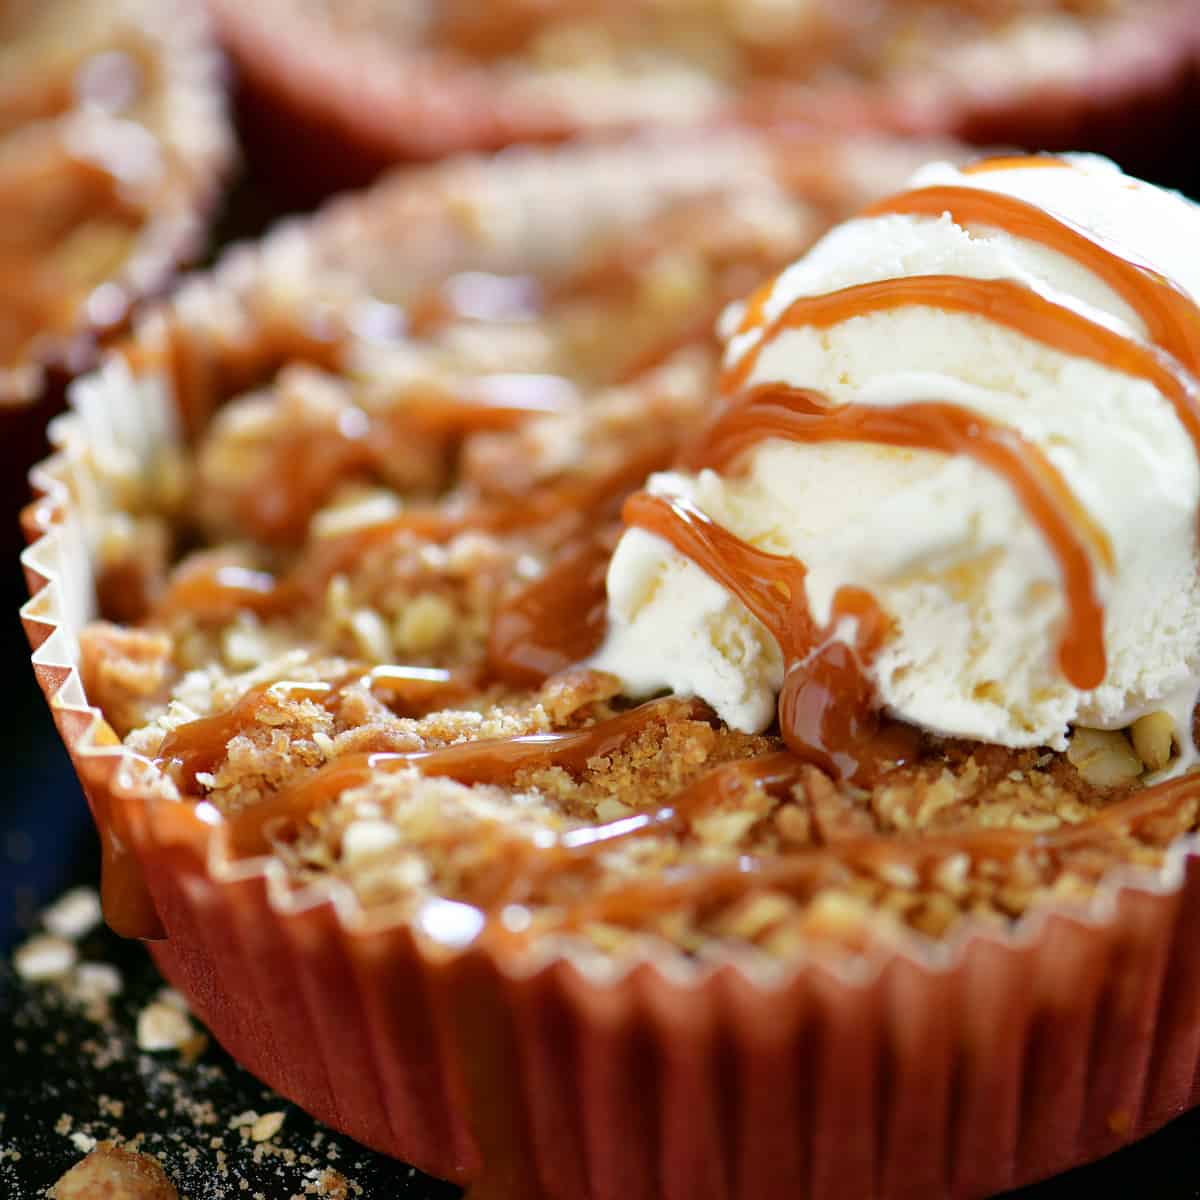
Imagine guests effortlessly picking up their own warm, golden crisp, perhaps topped with a scoop of melting vanilla ice cream and a drizzle of caramel. No messy plates, no awkward cutting, just pure, unadulterated apple crisp bliss. Whether you’re hosting a holiday feast, a casual get-together, or simply indulging your family with a special treat, these **mini apple crisps** are about to become your new go-to recipe.
Why Mini Apple Crisps Steal the Show at Any Gathering
The appeal of **mini apple crisps** extends far beyond their delicious taste. Their individual format solves many common party dessert dilemmas, making them a true crowd-pleaser and a host's dream.
*
Effortless Serving & Portion Control: The most immediate advantage is the convenience. Each guest receives their own perfectly portioned dessert, eliminating the need for plates of messy slices or concerns about uneven portions. This also inherently helps with portion control, allowing guests to enjoy just the right amount without overindulging (unless they opt for a second!). It significantly reduces food waste compared to a large, often-leftover pie.
*
Unbeatable Texture & Flavor Balance: Many argue that the crumb topping is the best part of an apple crisp, and with mini versions, you get an optimal ratio of crunchy, buttery oat topping to soft, spiced apple filling in every bite. This balance is often harder to achieve consistently with a larger pie. The tender, sweet-tart apples are perfectly complemented by the golden-brown, textural crumb, creating a truly satisfying mouthfeel.
*
Aesthetic Appeal: Let's be honest, individual desserts are inherently charming. These mini crisps look adorable lined up on a serving tray, making for an inviting and visually appealing spread. They add a touch of rustic elegance to any dessert table.
*
Hygienic & Convenient: In a world where shared platters are sometimes a concern, individual desserts offer a more hygienic option. Guests simply grab their own, with no communal serving utensils required for the main dish. They are easy to transport, making them ideal for bringing to friends' houses or office parties.
Crafting Your Perfect Mini Apple Crisps: A Step-by-Step Guide
Creating these delightful **mini apple crisps** is surprisingly straightforward. The process involves preparing the crumb topping, mixing the apple filling, assembling, and then baking to golden perfection.
The Irresistible Crumb Topping
The foundation of any great apple crisp is its crunchy, sweet topping. This recipe delivers a classic, satisfying crumble that balances perfectly with the tender apples.
1.
Combine Dry Ingredients: In a medium bowl, whisk together quick-cooking oats, all-purpose flour, light brown sugar, a touch of baking powder, and a pinch of baking soda. The baking powder and soda add a subtle lift and tenderness to the topping.
2.
Add Cold Butter: Introduce cold, unsalted butter, cut into small cubes. Stir the butter into the dry mixture until each cube is lightly coated.
3.
Cut in the Butter: Using a pastry blender (or your fingertips), "cut" the butter into the flour mixture until it resembles coarse crumbs, with some pea-sized pieces remaining. The key here is to keep the butter cold; this creates pockets of steam during baking, resulting in that wonderfully crisp and flaky texture. Set this topping aside.
The Sweet & Tangy Apple Filling
The heart of your **mini apple crisps** lies in the apple filling. The choice of apples and careful seasoning are crucial for a vibrant flavor.
1.
Prepare the Apples: Start by peeling, coring, and dicing your apples. We recommend dicing them into small, approximately 1/2-inch pieces. Smaller dices bake more quickly and are easier to eat in an individual portion, ensuring a consistent texture throughout. While you *can* cut them larger, be prepared for potentially longer baking times and a slightly chewier texture.
2.
Season the Apples: In a separate bowl, combine the diced apples with granulated sugar, a touch more brown sugar (for depth), a tablespoon of flour (to thicken the juices), fragrant ground cinnamon, and a hint of ground nutmeg. Stir thoroughly to ensure every apple piece is beautifully coated.
3.
Choosing Your Apples: For the best **mini apple crisps**, opt for apples that are tart and firm, as they hold their shape well during baking and provide a lovely counterpoint to the sweet topping.
*
Granny Smith: A classic choice, offering a delightfully tart flavor and firm texture.
*
Honeycrisp: Sweet, tart, and incredibly crisp, though often a bit pricier.
*
Fuji or Braeburn: Good firm options with a balanced sweet-tart profile.
* Consider using a mix of two different apple varieties to add complexity to the flavor profile.
Assembly and Baking Brilliance
Now comes the exciting part—bringing it all together!
1.
Line Your Baking Cups: Arrange sturdy baking cups (foil-lined or silicone work best; regular paper cupcake liners are not strong enough and will seep butter and moisture) in a large, rimmed baking sheet.
2.
Fill with Apples: Divide the coated apple mixture evenly among the baking cups. Don't be afraid to mound them slightly, as the apples will cook down.
3.
Top with Crumb Mixture: Generously sprinkle the prepared crumb topping over each mini apple crisp, ensuring a good, even layer.
4.
Bake to Perfection: Bake your individual apple crisps in a preheated oven at 375°F (190°C) for 30-35 minutes. They are ready when the apples are tender (test with a toothpick) and the crumb topping is beautifully golden brown and fragrant.
5. For more in-depth guidance on perfecting your bake, including troubleshooting common issues, make sure to check out our comprehensive guide:
Bake Easy Mini Apple Crisps: Your Ultimate Fall Dessert Guide.
Elevating Your Mini Apple Crisps: Tips for Success & Serving
Once your **mini apple crisps** are baked, a few simple tips can ensure they are enjoyed at their absolute best, whether immediately or later.
Storage & Reheating Savvy
Proper storage ensures your crisps stay fresh and delicious.
*
Cool Completely: Before storing, allow the crisps to cool completely on a wire rack. This is crucial to prevent condensation, which can make the topping soggy.
*
Refrigeration: Once cooled, individually wrap each mini apple crisp tightly with plastic wrap to maintain freshness. Store them in an airtight container in the refrigerator for up to 3-4 days.
*
Reheating: To serve warm, unwrap them and quickly reheat in the microwave for 15-30 seconds each, or for a crispier topping, warm them in an oven preheated to 350°F (175°C) for about 10 minutes.
Freezer-Friendly Genius for Future Indulgence
One of the best features of **mini apple crisps** is their fantastic make-ahead potential, particularly for freezing!
*
Freezing Unbaked: You can prepare the mini crisps up to the point of baking, then freeze them! After assembling the apple filling and topping in the baking cups, wrap each one tightly with plastic wrap, then an additional layer of aluminum foil. Place them in an airtight freezer bag or container for up to two months.
*
Baking from Frozen: To bake, unwrap the frozen crisps and place them on a baking sheet. Loosely cover the tops with foil to prevent over-browning, and bake at 375°F (190°C) for about 20 minutes. Then, remove the foil and continue baking until the apples are tender and the topping is golden brown and bubbly (another 15-20 minutes, or longer if needed).
* For a deep dive into advanced make-ahead strategies and foolproof freezing techniques, read our dedicated article:
Make Ahead Mini Apple Crisps: Bake, Store, & Freeze Perfectly.
Perfect Pairings & Presentation
The way you serve your **mini apple crisps** can enhance the experience even further.
*
Serve Warm: While delicious at room temperature, these crisps truly shine when served warm.
*
Classic Accompaniments: A generous scoop of creamy vanilla bean ice cream is the quintessential pairing. The cold, melting ice cream against the warm crisp is simply heavenly. A drizzle of rich caramel sauce takes it over the top.
*
Other Topping Ideas: Consider a dollop of freshly whipped cream, a sprinkle of toasted chopped pecans or walnuts, or even a spoonful of crème fraîche for a sophisticated tang.
Frequently Asked Questions About Mini Apple Crisps
Getting to know your ingredients and techniques can make all the difference. Here are answers to common questions about making **mini apple crisps**.
What kind of apples are best for mini apple crisps?
As mentioned, the best apples are tart and firm varieties that hold their structure during baking. Granny Smith is a top contender for its excellent tartness and crispness. Honeycrisp is another superb choice, offering a balanced sweet-tart flavor and satisfying crunch, though it can be pricier. Other good options include Fuji, Braeburn, and Gala. Sometimes, combining two different varieties can add a layer of complexity to the flavor profile. Avoid overly soft or mealy apples, as they will turn mushy during baking.
Does the apple size really matter?
Yes, the size of your diced apples can impact both baking time and eating experience. We recommend dicing apples into small, roughly 1/2-inch pieces for **mini apple crisps**. This ensures they cook quickly and evenly, becoming tender in the shorter baking window of individual portions. Smaller pieces are also easier to eat with a fork in a small cup, preventing large, unwieldy chunks. While you *could* use larger chunks, be prepared for potentially longer baking times to ensure they soften adequately, and they might be a bit messier to eat.
Can these mini apple crisps be made in cupcake wrappers in a muffin pan?
No, standard paper cupcake wrappers are generally not sturdy enough for baking **mini apple crisps**. The buttery, sugary filling can seep through the paper, making the crisps stick and potentially creating a mess in your muffin pan. It can also lead to a greasy exterior. For successful individual crisps, it's best to use sturdy foil baking cups, silicone muffin liners, or even bake them directly in a well-greased muffin tin. If using a muffin tin directly, ensure it's non-stick and generously greased, or line it with foil baking cups for easy removal.
Conclusion
These **mini apple crisps** are more than just a dessert; they’re a celebration of flavor, convenience, and charm. They offer the beloved taste of a classic apple crisp—warm, tender, spiced apples beneath a golden, crunchy oat topping—in a delightful individual serving that truly shines at any party or gathering. Easy to make, simple to serve, and even freezer-friendly for future indulgence, they undoubtedly outshine traditional apple pie when it comes to stress-free entertaining. So, skip the pie dish, embrace the individual portion, and get ready to impress your guests with these irresistible, perfectly portioned delights. Your taste buds, and your guests, will thank you!